Database Backup and Recovery
Oracle 11g Database Backup and Recovery
Database Backup
The ora-dump.sh script saves the current Oracle database to an Oracle dump file, named expfull.YYYYMMDD.dmp.gz, to the /Backup directory. The scp-ora.sh script copies the backup file to an external server. The two scripts in this section can be run using cron. The following line is an example cron configuration.
59 23 * * * . ./.bash_profile; $NexOSS_HOME/../Backup/ora-dump.sh ; $NexOSS_HOME/../Backup/scp-ora.sh
ora-dump.sh
The ora-dump.sh script dumps the Oracle database to a file in the /Backup directory. The dump file name (expfull.YYYYMMDD.dmp.gz) contains the date stamp of when the file was created.
#!/bin/sh
#
# ora-dump.sh
#
#######################################################################
# The ora-dump.sh script connects to the database via sql and performs
# a full database dump and writes the file to the /Backup directory with
# the file name format of expfull.YYYYMMDD.dmp.gz.  After the database
# dump, the script compresses the dump file.
#
# Preparation:
# ============
# Configure the Backup directory in Oracle using sqlplus.
#
#  login to sqlplus
#
# SQL> CREATE DIRECTORY Backup AS '/home/ossadmin/OSS/Backup';
#
#######################################################################
#
# Edit the variables shown below to match the Oracle system which will
# be backed-up.
#
export DUMP_DIR=/home/ossadmin/OSS/Backup
export ORA_HOME=/home/ossadmin/ORA/oracle/product/11.1.0/db_1
export ORA_USER=nexoss
export ORA_PASS=nexoss
export ORA_SID=labdell

cd $DUMP_DIR

rm expfull.*.dmp.gz

$ORA_HOME/bin/expdp $ORA_USER/$ORA_PASS@$ORA_SID DIRECTORY=Backup DUMPFILE=expfull.`date '+%Y%m%d'`.dmp FULL=y NOLOGFILE=y

gzip expfull.*.dmp
scp-ora.sh
The scp-ora.sh script uses the unix secure copy command to copy the Oracle dump file from the /Backup directory to an external server. Follow the configuration directions in the scp-ora.sh script to configure access to the external server.
#!/bin/sh
#
# scp-ora.sh
#
#######################################################################
# This script enables the client system with the Oracle dump file to
# access an external server via ssh securely without the need to enter
# password. This feature enables the client system to perform a secure
# copy (scp) of the Oracle dump file to the external server using this
# script, without user intervention.
#
# The UID (username) of the client system that owns the Oracle dump
# file must also exist on the external server system that will receive
# the Oracle dump file transfer.
#######################################################################
#######################################################################
# The external server must support public key authentication.
#
# To enable public key authentication add following two lines to
# /etc/ssh/sshd_config on the external server.
#    RSAAuthentication=yes
#    PubkeyAuthentication=yes
#
# Next, restart the ssh daemon (sshd) on the external server by
# executing the command:
#
### /etc/init.d/sshd restart
#
#######################################################################
#######################################################################
#
# Restart sshd on the external server.
# Next, generate a public RSA key on the client system and copy it to
# the list of authorized keys on the external server.
# On the client system execute (leave passphrase empty):
#
### ssh-keygen -t rsa
#
# This will create public key at /home/your_login/.ssh/id_rsa.pub.
#
#######################################################################
#######################################################################
# Next, copy the generated key to the external server
# (for example by 'scp' command):
#
### scp /home/your_login/.ssh/id_rsa.pub server_login@server_ip_address:/tmp
#
#######################################################################
#######################################################################
# After the client's public key is copied to /tmp/id_rsa.pub of the
# external server, login to the external server, add the client system’s
# public key to authorized keys list  on the external server by executing
# the command:
#
### mkdir /home/server_login/.ssh  (only if it's needed)
#
### cat /tmp/id_rsa.pub >> /home/server_login/.ssh/authorized_keys
#
#######################################################################
#######################################################################
# When done, try to login to server from client:
#
### ssh server_login@server_ip_address
#
# If you can successfully ssh into the server from the client, then
# you are ready scp without a password from this script.
#######################################################################
#
## Note:  Refer to the /Backup/OracleDB_Import.txt document, or the
## NexOSS User Manual for instructions on how to restore Oracle from
## the expfull.YYYYMMDD.dmp.gz file.
#
#######################################################################
#
# Edit the variables shown below to suite your systems.
#
export SCP=/usr/bin/scp
export OUTFILE_DIR=/home/ossadmin/OSS/Backup
export OUTFILE=expfull.*.dmp.gz
export REMOTE_USER=ossadmin
export SERVER=172.16.4.xx
export INFILE_DIR=/home/ossadmin/impdump
#
$SCP $OUTFILE_DIR/$OUTFILE $REMOTE_USER@$SERVER:$INFILE_DIR
Disaster Recovery Procedures
When a disaster occurs, the first step in the recovery process is to prepare the new server which will host NexOSS and Oracle.
Recovery Server Preparation
The environment of the recovery server which will host NexOSS and Oracle should be identical to the original server which hosted NexOSS and Oracle.
Follow the server preparation instructions in chapter 3 exactly.
If your server preparation was different from the steps in Chapter 3, document those differences and prepare the recovery server according to your custom preparation.
The Oracle version installed on the recovery server must be identical to the Oracle version used to create the Oracle dump file.
Oracle Recovery
The Oracle Installation on the recovery server must be the same version as the original Oracle installation.
Also, the Oracle on the recovery server must have exactly the same SID name, tablespace name, dbuser name, password and roles as the original Oracle installation.
Steps to Import the Oracle dump file
Login to the new Oracle system where the database import will occur. Log in as the UID that owns Oracle.
Create a directory for the Oracle import log file.
$ mkdir oralogLogin to SQLPlus to notify the database about the import log directory.
$ sqlplus nexoss/******@SID
SQL> CREATE DIRECTORY oralog AS '/home/oraadmin/ORA/oralog';
Move the export dump file to a directory where the impdp command can find it.
$ mv /home/oraadmin/expfull.dmp $ORACLE_HOME/rdbms/logUncompress the dump file.
$ gunzip expfull.YYYYMMDD.dmp.gzNavigate to the $ORACLE_HOME/bin directory to execute the impdp command to start the database import.
$ cd $ORACLE_HOME/bin
$ ./impdp <ora-user>/<ora-pass> DUMPFILE=expfull.YYYYMMDD.dmp FULL=y LOGFILE=oralog:full_imp.log
The following text box provides an example of what the user will see on the screen as the Oracle import process runs.
Connected to: Oracle Database 10g Enterprise Edition Release 10.2.0.1.0 - 64bit Production
With the Partitioning, OLAP and Data Mining options
Master table "NEXOSS"."SYS_IMPORT_FULL_01" successfully loaded/unloaded
Starting "NEXOSS"."SYS_IMPORT_FULL_01":  nexoss/******** DUMPFILE=expfull.20090421.dmp FULL=y LOGFILE=oralog2:full_imp.log
Processing object type DATABASE_EXPORT/TABLESPACE
ORA-31684: Object type TABLESPACE:"UNDOTBS1" already exists
ORA-31684: Object type TABLESPACE:"SYSAUX" already exists
ORA-31684: Object type TABLESPACE:"TEMP" already exists
ORA-31684: Object type TABLESPACE:"USERS" already exists
ORA-31684: Object type TABLESPACE:"NEXOSS" already exists
~
ORA-39151: Table "SYSMAN"."MGMT_SEC_INFO" exists. All dependent metadata and data will be skipped due to table_exists_action of skip
Processing object type DATABASE_EXPORT/SCHEMA/TABLE/PRE_TABLE_ACTION
Processing object type DATABASE_EXPORT/SCHEMA/TABLE/TABLE_DATA
. . imported "NEXOSS"."RATEDCDR"                         4.122 GB 6318122 rows
. . imported "NEXOSS"."REACDR"                           3.923 GB 6817793 rows
. . imported "NEXOSS"."ACDR"                             1.765 GB 3771014 rows
. . imported "NEXOSS"."SEACDR"                           1.259 GB 2885810 rows
. . imported "NEXOSS"."REPORTABLECDR"                    955.9 MB 1721160 rows
. . imported "NEXOSS"."RATEPLANDATA"                     686.2 MB 7743977 rows
. . imported "NEXOSS"."ICDR"                             32.55 MB   71207 rows
. . imported "NEXOSS"."LERG_6"                           30.89 MB  549289 rows
. . imported "NEXOSS"."TIER"                             18.05 MB  412409 rows
. . imported "NEXOSS"."SYS_EXPORT_FULL_01"               6.602 MB    8512 rows
. . imported "NEXOSS"."CDR_FILE_AUDIT"                   6.225 MB   73285 rows
. . imported "NEXOSS"."LERG_6_BREAKOUTS_BY_CITY"         3.543 MB  159282 rows
. . imported "NEXOSS"."CONFIGUPDATEQUEUE"                230.1 KB    5313 rows
. . imported "NEXOSS"."ACDR_EXT_RULES"                   6.140 KB       7 rows
. . imported "NEXOSS"."CREDITSTATUS"                     7.187 KB       6 rows
. . imported "NEXOSS"."CURRENCY"                         4.937 KB       3 rows
. . imported "NEXOSS"."EACDR_FILTER_RULES"               6.468 KB       7 rows
. . imported "NEXOSS"."RATEPLAN"                         13.08 KB      49 rows
. . imported "NEXOSS"."REPORTQUEUE"                      34.48 KB     223 rows
. . imported "NEXOSS"."BILLING_SUSPEND_FILTER"               0 KB       0 rows
. . imported "NEXOSS"."EXCHANGERATE"                         0 KB       0 rows
. . imported "NEXOSS"."EXCHANGERATEDATA"                     0 KB       0 rows
. . imported "NEXOSS"."EXTRA_SUSPEND_FILTER"                 0 KB       0 rows
. . imported "NEXOSS"."INVOICE"                              0 KB       0 rows
. . imported "NEXOSS"."REACDR_TO_VENDOR_RULES"               0 KB       0 rows
. . imported "NEXOSS"."TRAFFICSUMMARY"                       0 KB       0 rows
Processing object type DATABASE_EXPORT/SCHEMA/TABLE/GRANT/OWNER_GRANT/OBJECT_GRANT
Processing object type DATABASE_EXPORT/SCHEMA/TABLE/GRANT/CROSS_SCHEMA/OBJECT_GRANT
Processing object type DATABASE_EXPORT/SCHEMA/TABLE/INDEX/INDEX
~
Processing object type DATABASE_EXPORT/SCHEMA/TABLE/POST_INSTANCE/PROCACT_INSTANCE
Processing object type DATABASE_EXPORT/SCHEMA/TABLE/POST_INSTANCE/PROCDEPOBJ
Processing object type DATABASE_EXPORT/SCHEMA/POST_SCHEMA/PROCOBJ
Processing object type DATABASE_EXPORT/SCHEMA/POST_SCHEMA/PROCACT_SCHEMA
Job "NEXOSS"."SYS_IMPORT_FULL_01" completed with 2698 error(s) at 00:04:27
Login to SQLPlus and login to the new database with the same credentials as the original database. If login is unsuccessful, login to the DB console as sysdba and reset the password.
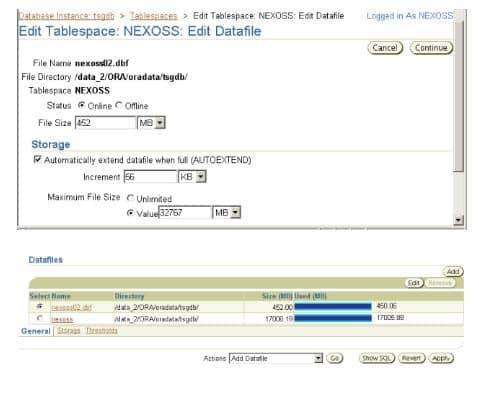
Note: If your original tablespace datafile (e.g nexoss.dbf) was set to auto-extend, this table property might not be set in the recovered database. If so, use the dbconsole UI or the SQLPlus CLI to add a new datafile (e.g. nexoss02.dbf) to your tablespace that includes the auto-extend property.
Add datafile using SQLPlus:
SQL> alter tablespace nexoss
 2  add datafile '/home/oraadmin/ORA/oradata/nexoss02.dbf' size 10m ;
 Tablespace altered.
SQL> alter database DATAFILE '/home/oraadmin/ORA/oradata/nexoss02.dbf' AUTOEXTEND ON;
Add datafile using DBConsole: